Cloning a GitHub repository from Visual Studio is a very easy task that you should already know as it is a very frequent action for developers to do. In any case, here are the steps to clone the remote repository:
- On GitHub, navigate to the root page of the repository. For instance, you can navigate to the root page of my demo application AdventureWorksSimpleDemo.
- Under the repository name, click the "Clone or Download" green button.

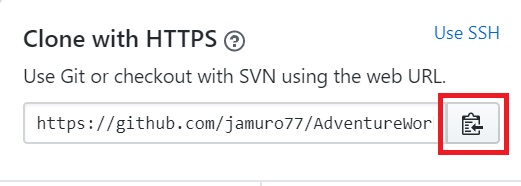
- Within the "Clone with HTTPS" pop-up window, use the icon (highlighted below in red) to copy the "Clone URL" for the repository we are working with. We will use this URL later on Visual Studio to connect to the remote repository.
- Open Visual Studio.
- Navigate to "Team Explorer" window by using the "View - Team Explorer" menu.
- Under "Team Explorer" window you should see the following menu options for "Local Git Repositories":
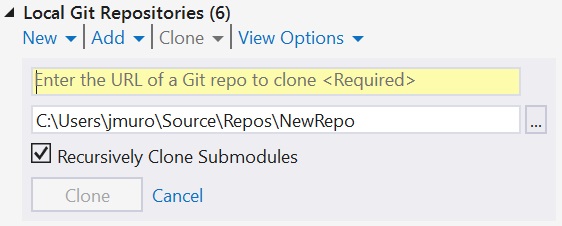
- Click "Clone" drop-down menu option and then:
- In the first text box, enter the URL to connect to the remote Git repository. This is precisely the one we got in third step.
- In the second text box, enter your desired local path for the cloned repository.
- Click "Clone" button to finish the cloning process.
If you also want to change the connection between your local and a new GitHub remote repository you can do the following:
- Click right mouse button under the repository name (in my case repository name is "Jamuro-BlogEngine"), as highlighted in red below, and then select "Settings".

- You should see a properties window that looks like the following for the "Remotes" sub-section:
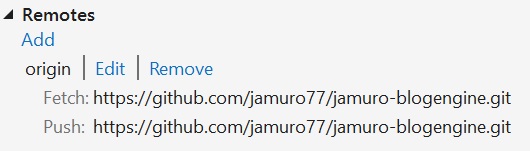
- Click "Edit" to update "Fetch" and "Push" URLs.
- Enter the repository URLs you want to use to "Fetch" and "Push" code. These URLs should be similar to https://github.com/xxx/xxx.git
That's all. Very easy. I hope this is useful for you.